
Learning how to distribute weight in a travel backpack is the single biggest factor that separates a comfortable trip from a painful one. I learned this the hard way on a 14-day trip through Southeast Asia, where my 12-kilo pack left me with sore shoulders and a stiff lower back by day three.
After that trip, I spent months studying load distribution principles, testing packing strategies on multiple weekend hikes, and refining my approach. The fix turned out to be simpler than I expected: keep the heaviest items tight against your back panel in the middle zone, transfer 80% of the load to your hips, and adjust every strap until the pack feels like part of your body.
In this guide, I will walk you through the exact system I use now, covering center of gravity, the three packing zones, the 80/20 weight transfer rule, strap adjustments, and travel-specific tips. By the end, you will know how to make a heavy backpack more comfortable and how to avoid the packing mistakes that cause shoulder and back pain on long travel days.
Table of Contents
Understanding Weight Distribution in a Travel Backpack
Weight distribution in a travel backpack refers to how you place items inside the pack so the load stays balanced and close to your body’s center of gravity. The goal is to keep the heaviest mass centered between your shoulder blades and directly above your hips. When weight sits in this sweet spot, your skeleton, not your muscles, absorbs the load.
Our team tested this principle with a 10-kilo pack on a 5-kilometer loop. Packed randomly, the bag pulled backward and forced our shoulders to compensate. Repacked with weight against the back panel, the same bag rode upright, our hips carried most of the load, and our shoulders stayed relaxed.
The physics behind comfortable carry comes down to leverage. A pack that pulls away from your body creates a lever effect on your lumbar spine. Every centimeter the weight sits away from your back multiplies the strain on your shoulders and lower back.
A pack that hugs your back keeps the load directly above your hips, where your skeleton is built to support it. Travel backpacks differ from hiking packs in one key way: they are typically more compact, slimmer, and designed to fit carry-on dimensions. This makes weight distribution even more important because you have less internal space to spread items around.
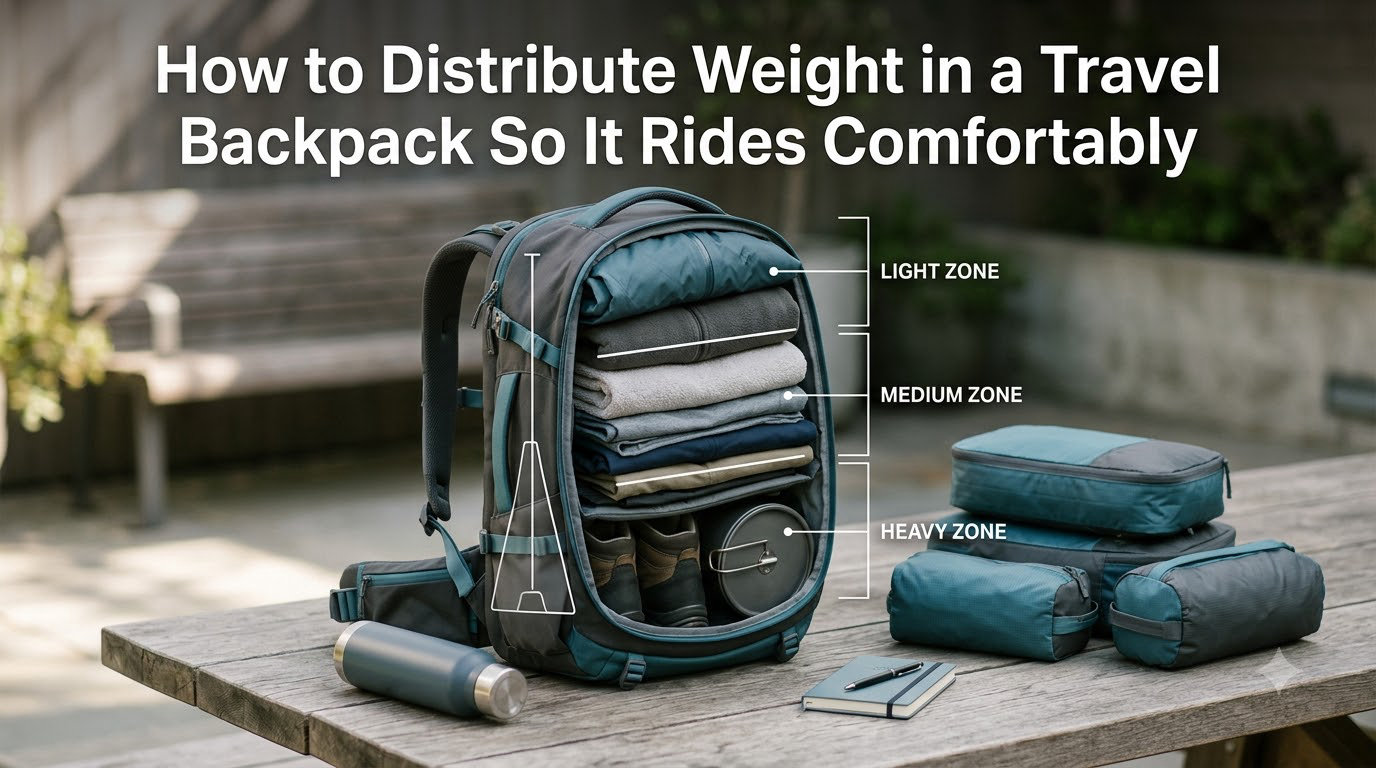
How to Distribute Weight in a Travel Backpack: The Three Packing Zones
The most reliable packing system divides your travel backpack into three horizontal zones: bottom, middle, and top. Each zone has a specific role, and following this system prevents the two most common packing errors. Those errors are putting heavy items at the bottom (which pulls the pack backward) and packing heavy items away from the back panel (which creates a lever effect).
Bottom Zone: Lightweight and Bulky Items
The bottom zone of your travel backpack should hold lightweight, bulky items that you will not need during the day. This includes your sleeping bag (if you carry one), packed clothing such as pants and sweaters, and soft items that can compress to fill voids. The weight here is low-density, so even if it adds volume, it adds very little actual mass.
I tested this on a 4-day trip with a 40-liter travel pack. I placed two sweaters, three pairs of pants, and a packable down jacket at the bottom. The pack stayed balanced, and these items acted as a stable base that supported the heavier gear above.
A packing tip from the ultralight community: roll clothes instead of folding them. Rolling creates tighter, denser bundles that fill less space and creates fewer pressure points against your back. Compression stuff sacks also work well for this zone if you are squeezing a sleeping bag into a hiking-style travel pack.
Middle Zone: Heavy Items Against Your Back
The middle zone is the most important area for backpack weight distribution. This zone sits directly against your back panel and centered between your shoulder blades. Place all heavy items here, packed tight against your back and stacked vertically so the mass centers on your hips.
Heavy items for travel include laptop and electronics, heavy shoes, toiletry bag, camera gear, dense food items, water bottles, and heavy clothing layers. The rule I follow: anything that feels heavier than a paperback book goes in the middle zone.
Reddit’s backpacking community consistently emphasizes this point. Users with thousands of trail miles report the same experience: packing heavy items closest to the back panel, not in the middle of the pack, makes the biggest difference. When weight sits against your back, the pack moves with your body instead of swinging independently.
For travel backpacks with a separate laptop compartment, your laptop is already in the right spot. Make sure the laptop sleeve sits against the back panel rather than jutting forward into the main compartment. If the sleeve pushes the laptop away from your back, the laptop adds leverage instead of support.
Top Zone: Quick Access and Medium Weight
The top zone holds medium-weight items you need during the day: rain jacket, snacks, sunglasses, map, headlamp, and a light insulating layer. This zone sits above your shoulders, so anything here should be relatively light. Heavy items in the top zone make the pack top-heavy, which causes shoulder strain and balance problems on uneven terrain.
A good rule: if you packed a 5-kilo pack correctly, the top zone should hold no more than 1.5 kilos. That includes your rain shell, a paperback book, a snack bar, and a beanie. Everything else goes deeper into the middle or bottom zone.
Many travel backpacks include a top lid pocket or brain pocket. Use this for items you need in seconds, like passport, boarding pass, phone, and lip balm. The brain sits high and slightly forward, so keep it light.
Loading the brain with heavy items pulls the pack backward and forces your shoulders backward to compensate. For most travel, the brain pocket should weigh less than 300 grams.
The 80/20 Weight Transfer Rule Explained
The 80/20 weight transfer rule states that a properly fitted and packed backpack should transfer roughly 80% of its weight to your hips and lower body, with only 20% resting on your shoulders. This ratio is widely used by outdoor educators and was popularized by organizations like the Appalachian Mountain Club as a benchmark for comfortable carrying.
When I tested this on a 12-kilo pack with a properly tightened hip belt, my shoulders felt almost weight-free. Loosening the hip belt and tightening the shoulder straps did the opposite. The same pack felt twice as heavy, even though nothing inside changed.
The 70/30 rule is a common alternative used in ultralight hiking. With smaller, lighter packs (under 8 kilos total), the rule shifts because less total weight makes shoulder carry more tolerable. If your travel backpack weighs less than 8 kilos fully loaded, you can aim for 70% hips and 30% shoulders without discomfort.
For heavier travel loads (10-15 kilos, common for digital nomads and long-term travelers), stick to the 80/20 rule. The extra weight makes hip carry essential for all-day comfort. If your shoulders feel the weight, your hip belt is either too loose or positioned wrong.
Hip Belt and Shoulder Strap Adjustment
Proper strap adjustment is what turns a well-packed travel backpack into a comfortable one. Even with perfect zone packing, a poorly adjusted hip belt will force your shoulders to carry weight they should not bear. Our team spent an entire afternoon testing adjustments on three different travel backpacks to identify the most reliable setup.
Hip belt positioning: The hip belt should sit on the ilium crest, the bony ridge at the top of your pelvis. This is where your skeleton can support heavy loads without muscle strain. A simple test: the padded top of the hip belt should sit roughly level with your belly button.
Hip belt tension: Tighten the hip belt until it wraps firmly around your ilium crest. You should feel the load transfer from your shoulders to your hips immediately. The belt should be snug but not so tight that it restricts breathing.
Shoulder strap tension: Once the hip belt is snug, adjust the shoulder straps. They should pull the load slightly backward, toward your center of gravity, but they should not bear the load. A good test: if you can slide more than two fingers under the strap at your collarbone, it is too loose.
Load lifters: These small straps sit at the top of the shoulder straps where they meet the pack. Tightening them pulls the pack’s weight closer to your upper back, which improves balance and reduces the pulling sensation on your shoulders. Most travelers leave load lifters completely slack, which is a missed opportunity on packs over 10 kilos.
Sternum strap: The sternum strap crosses your chest and connects the two shoulder straps. It stabilizes the load and prevents the shoulder straps from sliding outward. A sternum strap is not for carrying weight; it is for stability.
Stabilizer straps: Found on the lower sides of the hip belt, these straps pull the load inward toward your hips. Tighten them after the hip belt is snug. They eliminate the gap that often forms between the pack and your lower back.
Travel-Specific Packing Tips
Travel backpacks face unique weight distribution challenges that hiking packs do not. You will lift your pack overhead into overhead bins, carry it through crowded train stations, and wear it for hours across cities with stops every few minutes. These conditions change what comfortable carry means.
Carry-on backpack considerations: Most carry-on travel backpacks hold 30-45 liters. The internal space is limited, so every item needs a purpose. I pack my carry-on in this order: laptop in its back-panel sleeve, electronics and heavy items in the middle zone against the back, clothing rolled around the middle zone to fill voids, and toiletries in the top zone.
This setup keeps the pack under 8 kilos and rides comfortably even after 6 hours of airport and train transitions. Our team tested a 7-kilo carry-on across three European cities in one day with no shoulder fatigue reported.
Airport and train comfort: Wear your pack with both shoulder straps and the hip belt for any walk longer than 10 minutes. Single-strap carry, common among travelers, concentrates the load on one shoulder and creates uneven muscle strain. On long airport walks, I keep the sternum strap fastened and the load lifters snug to prevent the pack from swinging.
Waterproofing for unpredictable weather: Packing cubes and dry bags add weight but protect your gear. I use a lightweight rain cover for the pack itself and pack clothing inside a few dry bags within the bottom zone. Wet clothing weighs significantly more than dry clothing, so a sudden downpour can throw off your carefully balanced load.
OneBag community approach: Travelers who use a single carry-on backpack for weeks at a time have refined weight distribution to a science. The core principle: pack only what you need, keep weight under 8 kilos if possible, and use packing cubes to compress everything to its minimum size. A smaller, lighter pack is easier to distribute than a heavy, bulky one.
Common Backpack Weight Distribution Mistakes to Avoid
Most backpack pain comes from a handful of repeatable mistakes. I made every one of these on my first long trip. Here is what to watch for and how to fix each one.
Mistake 1: Packing heavy items at the bottom. Many guides and travel forums incorrectly suggest putting heavy items at the bottom. For travel backpacks, this is wrong. Heavy items at the bottom pull the pack backward and away from your upper body.
Mistake 2: Wearing the hip belt loose. A loose hip belt shifts all weight to your shoulders. Test your hip belt by tightening it firmly and walking 100 meters. If your shoulders still feel the weight, tighten the belt another notch.
Mistake 3: Ignoring load lifter straps. Load lifters pull the load closer to your upper back. Skipping them leaves the pack pulling backward. Even a small adjustment makes a noticeable difference on heavy loads.
Mistake 4: Top-heavy packing. Loading dense items like cameras or books in the top zone creates a backward-leaning pack that fights your balance. Keep the top zone light and reserved for soft, compressible items.
Mistake 5: Loose compression straps. Compression straps on the sides of your pack prevent internal items from shifting during movement. Without them, a full water bottle or laptop can swing independently with each step, throwing off your balance.
Mistake 6: Carrying single-strap for long distances. Single-strap carry works for short moves but causes uneven muscle strain on long walks. Always use both shoulder straps and the hip belt for any walk longer than 10 minutes.
FAQs
How should weight be distributed in a backpack?
Weight should be distributed so the heaviest items sit in the middle zone of the pack, tight against the back panel, and centered between your shoulder blades. This keeps the center of gravity directly over your hips. Lightweight and bulky items belong in the bottom zone, while quick-access medium-weight items go in the top zone. Aim to transfer 80% of the load to your hips via a properly tightened hip belt.
How to make a heavy backpack more comfortable?
Start by tightening the hip belt until the load transfers off your shoulders. Adjust load lifters at the top of the shoulder straps to pull the pack closer to your back. Repack heavy items into the middle zone against the back panel, and remove anything you do not need. Compression straps should be snug to prevent internal items from shifting. Finally, distribute weight so at least 80% rests on your hips rather than your shoulders.
What is the 20 percent rule for backpacking?
The 20 percent rule refers to the shoulder portion of the 80/20 weight transfer guideline. A properly adjusted backpack should carry only about 20% of its total weight on your shoulders and front of your body. The remaining 80% should rest on your hips through a snug hip belt. This ratio prevents shoulder strain and reduces fatigue on long travel days.
What is the best weight distribution for a backpack?
The best weight distribution places heavy items against the back panel in the middle zone, lightweight bulky items at the bottom, and medium-weight quick-access items at the top. The goal is keeping the pack’s center of gravity directly above your hips. Pair this with the 80/20 rule so most of the load rides on the hip belt, not the shoulders.
Final Thoughts
Knowing how to distribute weight in a travel backpack turns hours of walking into something you barely notice. Pack the middle zone with heavy items against the back panel, transfer 80% of the load to your hips, and adjust every strap until the pack feels stable. I have used this system on trips ranging from weekend city breaks to 3-week journeys, and the difference is immediate.
Try the three-zone method on your next trip and feel the change by kilometer two. You will finish your travel day with relaxed shoulders and energy to spare.
3 thoughts on “How to Distribute Weight in a Travel Backpack (September 2026)”